Chatterpix app

Chatterpix app

This is a simple free app that allows a mouth and speech to be added to a photograph. The photograph can chosen from those already on the camera roll or taken in the app. 

  1. Take or choose the photo.
  2. Use your finger to add the ‘mouth’ to the photo.
  3. Use the microphone button to record up to 30 seconds of speech – a clock ticks down to show how much time is left.
  4. Text, frames or stickers can be added next.
  5. The talking photo is saved in the app (in gallery) or you can email it, save to camera roll or add to YouTube.

Here’s an example I made of four things in the garden talking about their secret life:

There is a version of the app called ChatterKids. In this version of the app there is no opportunity to share, making it safer for use by children. The talking picture can be saved onto the camera roll.

BYOD4L Communicating

Bring Your Own Devices 4 Learning #BYOD4L

This week I’m taking part in this online course. Here are some useful links:
byod4l wordpress
@byod4l
Google+ community BYOD4L Learning COmmunity

Tuesday – Communicating

In the student scenario the student talked about joining a degree course as a mature student and seeking to manage the demands of university study, a job and family life and considered the challenge of how to use technology to stay in touch with his course and fellow students. This is exactly the situation the students I teach are in. They are Teaching Assistants (TAs) in schools, coming to university for one day a week so its vital for them to be able to stay in touch with us and each other when they are not at university.

For us as lecturers we have a several channels of communication:

Blackboard NILE – announcements, which we often choose to have sent as emails to students. We hope we can guarantee that everyone gest this information.

Course Blog – to share interesting items and resources that is additional to core content. Students are encouraged to subscribe to this so that they will get an email alert when a new post appears. A link to this is also tweeted.

Email – to individuals, usually responsive to student questions and concerns.

NILE discussion boards – Sometimes we create a NILE discussion board for students to use to ask questions and share ideas, especially about assignments. This allows tutor answers to be shared by all students and might mean that we don’t have to answer the same question via email to many individuals.

Task 1 Visualising – A representation of myself as a communicator: I created this ThingLink introducing My Digital Self in the summer.

Task 2 Making – I’ve represented a summary of my formal channels of communication as lecturer with students using Penultimate:

IMG_0090

Task 3 Reflection – We allow students to decide and manage communication within groups for themselves and this often evolves. Perhaps it is dependent on someone in the group deciding to take the initiative using a channel they favour. One group has a Facebook group and another use Whats app. As tutors we do not get involved with this but are aware of some of answers to questions, for example, being shared in this way. My only concern is that the chosen channel does not exclude some students in the group eg if a group used Facebook but one or two members are adamantly against Facebook and so are exclude from the conversation and support.

My reflection  on future actions – I wonder if we need to be more proactive about this during Induction into year 1 so that students choose one from several channels after discussion of their features and the students’ own devices, skills and attitudes to them. I think I will contact each existing group and ask what they use and their evaluation of it to see if we can learn something from this ready for the students who join us in September 2016.

Aurasma

aurasmaAurasma is an augmented reality app that allows you too a picture, sound or video to a picture or object.

It is available as an app for IOS and Android mobile devices and tablets. The website is here.

In order to use it you need to create an account or use other existing accounts to log in (google+ etc).

The app works in a similar way to a QR code reader. When you hold your device over an ‘aura’ this triggers an image or video on your device. The app can be used to create your own auras for fun or learning. Unlike a QR code the symbol, object or picture itself triggers the aura, which can be an interesting and useful feature of using it. In order to access it the aura must be public and the user must sign into aurasma and follow the maker of the auras or the channel they are on.

This video clip is a clear guide to how to create an aura:

2015-04-17 12.32.50I’ve just made these paw prints and added an aura of the creature that makes each one. I’d be asking children to look at talk about the prints, using their existing knowledge to sort them, possibly identify them and make guesses. they can then use a phone or tablet with the aurasma app to check which animal made the track. On the back I have added a QR code that takes the user to further information about each creature so they can research them further. Discussing this with students it was suggested that pictures of the animals or the names could be available for matching before checking using the app.

Other uses in education might be:

  • adding to photos of children’s activities and linking to videos of them performing these activities eg photo of the school choir, video of the choir singing;
  • adding to pictures to provide extra written or spoken information;
  • adding a speech to a picture of a story character eg picture of the big bad wolf, video of his saying ‘I’ll huff and I’ll puff and I’ll blow your house down!’
  • adding a description or explanation of a piece of art or technology made by a child.

If you are using aurasma or a similar app add your ideas and links below.


Post it Plus

pipI came across the app ‘Post it Plus’ by accident. I often use post its as a teaching tool with groups of students, asking them to write ideas on post its and then move them around into themes or rank order. Since I had my ipad I have sometimes photographed these – but the Post It Plus app is a more flexible and versatile way of doing this.

When you open the app it allows you to take a photograph of a group of post its. To do this you hold down  the capture icon. Green lines appear around the post its that have been captured and if there are any that do not have a green line, you can touch these and the green line will appear around them so that all the post its are present. You then touch ‘create board’ and the image is saved. I usually take groups of post its and end up with maybe four or five boards to record an activity.

IMG_0333

After this you can move the boards on top of each other to make them all into one, you can name each group and the bigger group, add additional post its and write onto them and the board.

You can also share and export the boards in a number of ways eg by email as a PDF, as a photo, via social media etc. I was able to send the PDF record of our discussions to a group of students after the session so that they could use the discussion ideas after the session. I could have annotated questions and  comments onto it to challenge them further – maybe next time! I’ve added one to see what it looks like, above)

You can read more about the app here.

Explain Everything

Explain Everything

Explain Everything is an app (IOS, Android and Windows)

Cost – £2.29 in the Apple appstore.

You can read about it at this link Explain Everything

It is a very flexible presentation tool allowing you to:

  • import and insert documents, pictures and video
  • draw and annotate
  • move and animate
  • zoom and pan
  • record and play
  • export and share

There are some useful video tutorials available at the link above and some help pages within the app.

So far I have used Explain Everything in three different ways.

I have made a presentation that consists of a sequence of slides that I have added spoken commentary to. This was to introduce an assignment to students and remind them of where the supporting resources are. It was useful to be able to record the commentary with each slide and it was very easy to stop and rerecord small sections without having to record the whole thing in one go.

It can be seen here:

I have also narrated a short guide for students showing them how to get from the opening page of a NILE module to their discussion board and then how to access and use the discussion board. It was so useful to be able to click on the sequence links and show students where to click and what to expect live in the website.

It can be seen here:

Finally I have used it construct two page by page views of collaborative sketchbooks that I have been working on this year. I was able to add the sequence of photos, add annotations and export the presentation to YouTube, Dropbox, imovie and ibooks and email it to myself. I would like to have added music but couldn’t quite work out how to do this.

One of these can be seen here:

I think this app has got a huge amount of potential for use with and by students and I am looking forward to exploring it further.

Padlet

Link –  Padlet

Padlet allows you to set up a space or ‘wall’ that you and others can add text, pictures and links to immediately. You can see these pop up on the screen and you can share or download the contents of the Padlet wall.

Website – free to use

Helppadlet help

Account – set up using your email address, with Facebook or with your google account

padlet lableHow to create a wall

Click the ‘create new padlet’ label or the + on padlet instthe right hand list.

This will create your new padlet wall.

You can then give your wall a title and description using the daisy wheel symbol at the bottom of the list on the right.

When you click on this symbol you have other options too.

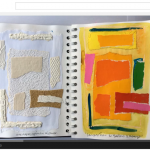
You can add an image and a background (wallpaper) to the wall and choose whether the layout will be free form, a stream or a grid.

padlet instr
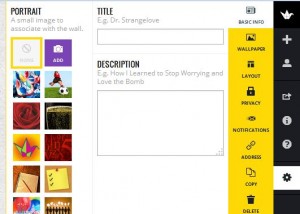
You can copy the wall if you want to use the same wall with different groups of people.

You can make the wall private, password protected or public depending on your requirements.

share                                           
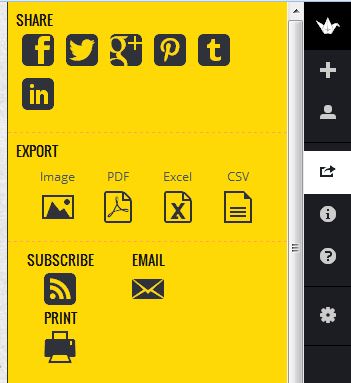
When you click on the arrow symbol this gives you various options to share the padlet wall so that others can add to it.

As you can see you can email the link or share it using social media.


Why use a Padlet wall?

You can use this tool to ask pupils or students in a class or people in an audience to contribute comments, ideas, recommendations in the form of text, pictures and links. It can be useful to collect views after an event or experience. When the wall is complete you can download it as a PDF.

At this link you can see a Padlet wall used as a record of an event – TMNorthants 2014

At this link you can see how teachers have added questions ans challenges to a maths starter:

Minion Alphabet Maths

At this link you can see at Padlet wall created in the Literacy Shed with children’s book recommendations:

Picture Book recommendations

and here is a Padlet that the FDLT Y2 MK group contributed to in a session:

FDLT Y2 MK

Your ideas:

If you use Padlet walls please share links and ideas in the comments section.


Skitch

Skitch

Cost – free

Skitch is an iphone / ipad / Android app that allows you to annotate photos or images with text, arrows and highlights. It is also available to use on a computer (Windows or Mac).

There is some useful guidance about how to use the features available at this link – Skitch guidance

and a video tutorial here – Skitch video tutorial

2014-05-25 22.48.37Skitch can be used as a way of adding words, captions and sentences to images found or taken by the learner.

English

Write descriptive sentences about can be seen in the image.

Annotate an image with questions.

Annotate an image with descriptive words to later use in writing about setting, character etc (a way of developing a word bank).

Label a diagram or photo using boxes or arrows.

2014-05-25 22.59.02Other subjects

Use labelling to teach, learn, extend subject specific vocabulary.

Use as a visual word bank.

Use as a way of noting thoughts or description on a visit – immediate reaction.


Light Trails

Light Trails Camera Pro

Cost – free

Preview – If you have the preview screen showing you can see the light trials build up. If you are writing or trying to capture something planned this is essential. Tap the word ‘preview’ to get it or remove it.

2014-03-25 08.29.512014-03-25 08.29.21


Camera settings (icon on left)

2014-03-25 08.39.03Capture mode – set to light trails

Shutter speed – the larger the number the longer the shutter stays open (eg 15 seconds). If the shutter speed is set to B the shutter is controlled manually so you can decide when it shuts. This useful if you are photographing a preplanned light trail (eg writing your name).


Camera settings (icon on right)

2014-03-25 08.42.06

Self timer – 0 (unless you want to use this – if trying this out alone it can be useful)

Screen shutter – button to left

Auto save – on or off


Other useful tips:

The record button is the circle in the centre and it goes red when photographing.

When the photograph has been taken if you touch the arrow to the right you are given the option of saving the photo to camera roll.

Freeze – half way between off and on.

Contrast – button half way along.

jean